Category Archives: Database Administration Tasks
Point In Time Restores
One of the many skills needed by DBAs today is the ability to restore a database from backup using point in time recovery. This option is only available if you are using the full or bulk-logged recovery model (see my post on recovery models). The default time shown is the ‘most recent possible’ which works in most scenarios.
Why would I need to restore to a point in time? There are many different reasons, one being that you noticed through your monitoring or logs that things went south at a certain point in time. Therefore, we want to restore a minute or two prior to that time. Another scenario that I have seen is that a change is made in an application in production at a certain time. They now want those changes demoted down into a testing environment. In this scenario we would want to make sure our restore includes that point.
How do I do it? In the restore database dialog, you select the ellipsis (…) button to the right of the point in time field below the database name and you will see a date and time option, as shown in Figure 1. Select the remaining restore options as you normally would. Not sure about the rest of the options? See the MSDN directions detailing point in time recovery. Enjoy!

Figure 1 – Point In Time Restore
Red Gate Virtual Restore Scripting (Part 10)
If you have been following along since December, then you know that I have been doing some investigation with the Red Gate Backup and Restore bundle to implement in our system with our use of Ola Hallengren’s backup maintenance scripts. One of our last stumbling blocks has been automating and scripting of the Red Gate Virtual Restore product. We have moved methodically through the list and with the help of Red Gate’s excellent support department resolved each item including this one.
The problem we had been that when we tried to verify the backup through restoration and DBCC CHECKDB on a certain database, that was considerably larger than all of the other databases on this server, we would not have enough space on the drive using our restore script we created last week. That scripting solution is great as long as there is enough space on the drives to attach the database files from backup and then drop them.
The beauty of the Virtual Restore product, in case you did not already know, is that it can restore these files with a much smaller footprint than the actual database files take up in the exiting format. However, the problem is that it is strictly a wizard at this point that will grab a specific backup and run the restore manually and then drop it once it checks the integrity and consistency. This is a great product but this is feature should be included or else it does not help much especially when you have hundreds of databases.
We ran the wizard and then viewed the script:
RESTORE DATABASE [TestDB_Virtual] FROM
DISK=N’I:\TestDB\FULL\SQLPROD40_TestDB_FULL_20130101_213217.sqb’
WITH MOVE N’TestDB_Data’ TO N’F:\VirtualRestore\TestDB_Data_TestDB_Virtual.vmdf’,
MOVE N’TestDB_Index’ TO N’F:\VirtualRestore\TestDB_idx_TestDB_Virtual.vmdf’,
MOVE N’TestDB_Log’ TO N’F:\VirtualRestore\TestDB_Log_TestDB_Virtual.vldf’, NORECOVERY, STATS=1,REPLACE
GORESTORE DATABASE [TestDB_Virtual] WITH RECOVERY, RESTRICTED_USER
GODBCC CHECKDB ([TestDB_Virtual])
GODROP DATABASE [TestDB_Virtual]
GO
This script did not work when we ran it via T-SQL because of a lack of disk space which is the same problem we encountered using the Backup Pro restore script, however it did work with the Red Gate Virtual Restore Wizard. We contacted support to find out why there was a difference on the same box. Basically SQL Server does not know that the HyperBac service is running in the background. The wizard is smart enough to check your disk space and if you do not have enough it temporarily adds an entry into the HyperBac configuration that tricks SQL Server into thinking that you have the right amount of disk space in order to complete the task.
The parameter is “VirtualDiskSize=” where the value is an integer to represent the disk size in megabytes. You add the parameter to the bottom of the to the hyper.conf file found in the C:\Program Files (x86)\Red Gate\HyperBac\Bin folder. At this point then you restart the HyperBac service and the problem is solved! Next I will try to automate this script….stay tuned!
Creating a Red Gate Backup Pro “Virtual Restore” Job Automatically (Part 9)
If you have been playing along at home this month then you know about some of the struggles that I have faced with automating the Red Gate Backup Pro automatically. Well, with the help of Red Gate and some rewriting of their provided script, I now have a script that will work automagically! When I say automagically, I mean that I want the script to run forever without any more interference from me in the same manner that our Ola Hallengren backup scripts work.
If you are not familiar, this tool is excellent for many reasons but one of the reasons that we like it is for the simple fact that if a new database is created, it will be maintained automagically. I do not have to create any maintenance plans or agent jobs each time I add a database to a server. We have several servers that get new small databases all the time and this is a time saver as well as a life saver. Now this scripts will do the same, it will iterate through the database names and restore the latest backup set as a new database with the name ‘_Restored’ tacked on the end of the existing name and place the data and log file in a separate directory to avoid overwriting your existing databases.
Do not worry about failure reporting with the job as Red Gate will send you an error for each database, pass or fail. If you wish to see only the failures then change ‘MAILTO’ to ‘MAILTO_ONERRORONLY’ in the script.
–This script will restore multiple databases where each database has it’s own Full Backup to be restored.
USE masterDECLARE @dbname NVARCHAR(260)
— Add any databases in that you want to exclude
DECLARE cdatabases CURSOR FOR
SELECT name
FROM sysdatabases
WHERE name != ‘tempdb’
AND name != ‘master’
AND name != ‘msdb’
–Set @restorepath to be the path of where your backups are located, in my example this is ‘D:\Backup\’
DECLARE @restorepath VARCHAR(500)
–@filename will need to be modified depending how the backup files are named
DECLARE @filename VARCHAR(500)
DECLARE @restorestring VARCHAR(1000)
–Not needed if running in a SQL job
DECLARE @exitcode INT
DECLARE @sqlerrorcode INTOPEN cdatabases
FETCH next FROM cdatabases INTO @dbname
WHILE @@FETCH_STATUS = 0
BEGIN
SET @restorepath = ‘D:\SQLVMDEV10\’ + @dbname + ‘\Full\’
— @filename will need to be modified depending how the backup files are named
SET @filename = @restorepath + ‘SQLVMDEV10_’ + @dbname + ‘_FULL_*.sqb’
SET @restorestring = ‘-SQL “RESTORE DATABASE [‘ + @dbname + ‘_Restored] FROM DISK = ”’ + @filename
+ ”’ SOURCE = ”’ + @dbname + ”’ LATEST_FULL WITH MAILTO = ”ed@sqlgator.com”, RECOVERY, DISCONNECT_EXISTING, MOVE DATAFILES TO ”G:\VirtualRestore”, MOVE LOGFILES TO ”G:\VirtualRestore”, REPLACE, ORPHAN_CHECK, CHECKDB = ”ALL_ERRORMSGS, DATA_PURITY, EXTENDED_LOGICAL_CHECKS”, DROPDB” -E’
–If you wish to apply additional backup, remember to change the WITH RECOVERY to WITH NORECOVERY,
EXEC master..Sqlbackup
@restorestring,
@exitcode output,
@sqlerrorcode output–IF (@exitcode <>0) OR (@sqlerrorcode <> 0)
— BEGIN
— RAISERROR (‘SQL Backup job failed with exitcode: %d SQL error code: %d’, 16, 1, @exitcode, @sqlerrorcode)
— END
FETCH next FROM cdatabases INTO @dbname
ENDCLOSE cdatabases
DEALLOCATE cdatabases
This will generate multiple entries in Red Gate Monitor, as mentioned in Part 4 of our journey. In order to prevent these setup a maintenance window on your monitoring tool and run this script only during the maintenance window ensuring that no other jobs run during that time so that you do not miss any important alerts from those maintenance jobs. Here is a link from Red Gate detailing how to set the maintenance windows in Monitor. Enjoy!
Migrating SQL Server Database Logins with sp_help_revlogin
The third most popular blog post for 2012! Enjoy!
You’ve migrated your database to a new box, with no problems. You created the login that goes with this database, and all is right in the world. However, when your user goes to connect to it they get the dreaded error 18456, login failed. But wait, I created the login, right?
Not so fast there, accidental DBA. You are going to need the help of a nifty stored procedure called sp_help_revlogin. This stored procedure, provided by Microsoft in the link below, will generate a T-SQL script that will copy the logins, their passwords and their corresponding SIDs (or security identification number, which is usually the culprit here). This is also a great utility when the database has numerous users with various security levels and passwords. Really now, who wants to write all of that down and recreate it? Even with screenshots, it can turn into a large, fat-fingering and time consuming event. …
View original post 70 more words
SQL Nexus, Read Trace Errors Resolved!
The fifth most popular blog post for 2012!
Last Monday we started our SQL Nexus journey together in order for me to refresh my knowledge of this awesome tool. Near the end of last week, the blog series was delayed due to an error with the ReadTrace and its corresponding report. Yesterday and again today, I am troubleshooting our attempt to resume our journey but with little hope for correcting the error. I have posted the error on CodePlex and am awaiting a response.
Yesterday, I referenced a “ReadTrace exit code: -2” error in the ReadTrace log file. I did find one page out there on SQL Server Central where Grant Fritchey (Twitter | Blog) had encountered the problem. After contacting, Grant he told me that the problem that he had was a simple one, he did not have the file and path name correct which corresponded with the file not found error higher up in the ReadTrace log. However, when cutting…
View original post 251 more words
Red Gate Backup Restore of the Master Database (Part 8)
One of the errors I encountered with the Red Gate Backup Pro tools discussed extensively this month, was in running the DBCC CHECKDB command on a temporarily restored backup. It gave errors about the consistency which did not appear in the actual master database. The following are some interesting blog articles in response to this issue:
- Response from Red Gate.
- Response from Paul Randal and Kimberly Tripp on SQL Server Pro magazine.
Basically you will need to do the master database separately. I run an integrity check weekly against the system databases. It is a good idea to follow the recommendations from Red Gate listed in the link above. Enjoy!
Red Gate Backup Pro Continued (Part 7)
If you have been keeping score at home, I have been trying to work out the issues of implementing the Red Gate SQL Backup Pro and Virtual Restore. This series may sound like a bunch of complaints, they are not. I am just working through the issues and hoping to help others struggling and hopefully improve the product if possible. If some of these items are easily fixed, I could not find the information easily on their website otherwise I would not have posted it. Or it could be quite possibly that I am just an idiot.
I was able to resolve one issue from yesterday post, the weekly regular SQL Server copy-only backup. By tweaking the HyperBac Configuration Manager settings for the BAK extension and disabling HyperBac compression (see Figure 1) we were able to get default SQL Server backups running once a week in the midst of using SQL Server Backup Pro for our daily backups.
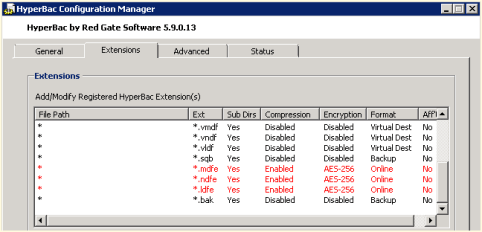
Figure 1 – HyperBac Configuration Manager
We also noticed a weird error in our SQL Monitor tool when using the Virtual Restore (see Figure 2). The drive is only 300 GB where we store our Virtual Restores. It looks like the Virtual Restores raise a drive space error based upon the “actual” size of the restore instead of the virtual size.

Figure 2 – Drive Space Error in SQL Monitor
Just in case you are wondering, I compiled my long list of quirks and submitted it to Red Gate support. I am confident that they will be able to help as they have been excellent in the past. Personally, I just like to figure things out before I talk with support, which many probably find as a character flaw. Maybe it is male ego or pride but I like to solve problems without help if at all possible. On the other hand, I am never afraid to ask for help, I just want to make sure I have tried everything before hand. Enjoy.
Red Gate Backup Pro Update After A Weekend of Jobs (Part 6)
Last week I blogged about my experiences implementing the Red Gate Backup Pro and Virtual Restore. Today I have a few more observations and items that I need to investigate.
- We setup a weekly copy-only backup using default SQL Server compression to give my supervisor ‘warm and fuzzies’ over switching to a proprietary backup format. We noticed this weekend that the servers with the HyperBac/Virtual Restore tools installed failed on a regular backup. When we manually stopped the HyperBac service and ran the backup, it completed successfully. When we re-enabled the service the backup failed again. We decided to forgo using HyperBac, I may try deactivating that part of the license and see if that alleviates the issue.
- Some of our restores fail when we script them and run fine when we run them manually.
- Some of the restores report DBCC CHECKDB issues and when we run DBCC CHECKDB on the actual database there are no issues.
- I would like to script the real Virtual Restore product, but as of yet have been unable to.
I will keep everyone posted as to my progress. Enjoy!
Database Ownership: An Editorial
Over the last few months, I have talked to a few different DBAs who tell me that their environments are setup in such a manner that many DBAs are involved yet no one ‘owns’ any of the servers. When I ask who is responsible the answer is either everyone or no one in particular. Obviously the DBAs in question are high quality administrators working within a system that they have no control over. Maybe this is the norm for large organizations, ones with hundreds or thousands of servers. Personally, I have never worked on such an economy of scale.
I understand that there are a large number of servers, but I would think that somewhere those numbers would be sliced up into smaller groups of administrators allowing for redundancy but incorporating ownership by a small group. Then that group takes ownership and is responsible for the bank of servers.
My style is such that I love and care for my servers as well as taking ownership of them. I know their history, their quirks, their specs, and if it is a detail that I cannot memorize then I track it. I have 32 SQL servers with almost 300 databases, therefore it is impossible for me to memorize all of the nuances but I have them tracked and the information easy to find such that I can tell you within a minute or two if you ask. How can you do that or do you even need to do that when you have thousands of servers?
In addition, ownership allows me to make those servers a priority and hopefully nothing slips through the cracks. However, if it does then it is my mistake and mine alone. I am responsible. End of story. In those organizations no one is really responsible from what I understand. How do you accomplish or do you even care in a larger organization? Is this much ado about nothing?
MAP Toolkit Licensing Continued
Continuing yesterday’s post regarding the licensing issues I discovered using the MAP Toolkit, I was able to resolve the issue without much difficulty. The license was showing in the MAP Toolkit as developer edition. We have volume licensing so I am sure now that wrong installer was selected at the time of install because we do not use keys as they are populated by the installer.
To correct the problem, we ran the installer on the server effected and selected ‘Edition Upgrade’ and selected the media. When prompted for a product key, we had to fool the installer with some trickeration. On a separate VM, we installed SQL Server using our Enterprise media which generated a key code in the box at the same point in the installation. We then typed that key into our real installation and proceeded with the ‘Edition Update’ thus allowing the installer to realize that we were licensed for a different version. This successfully updated our edition to Enterprise as this was the license purchased for this server.
However, after stopping and restarting SQL Server to get the new version to register we noticed that the SQL Agent was failing with no errors noted in the SQL error log or the Agent log. We ran the ‘Repair’ from the installation center (shown in figure 1) to make sure that there was no corruption with the previous edition. That did not resolve the problem. When running the agent from the command line we got a different error that pointed us to the login being incorrect. Somehow running the Edition Update locked out the AD account which is used only by this service on this server so a user could not have been to blame (or should not be able to). Once unlocking that account, SQL Server Enterprise Edition was running smoothly! Enjoy!

Figure 1 – Edition Upgrade


