Primary Key versus Unique Key

SQL Schoolhouse!
Recently, I was asked the difference between a primary key and a unique key and this seemed like a good topic for a blog post.
First of all, the primary key is the key that will uniquely identify the record and enforce entity integrity. By default this will create a clustered index on the column or columns selected. The unique key, like the primary key, will be unique, however it creates a non-clustered index by default. The unique key will also allow one NULL record where the primary key will not allow any.
In addition, there is only one primary key per table, whereas you can have multiple unique keys. Enjoy!
HyperBac No More
In case you missed it last week, Red Gate announced the death of the HyperBac tool for backup and recovery. I am not surprised by this move as the features were pretty much the same as the Backup Pro tool also offered by Red Gate. When I setup a test case for the tools in comparison with Backup Pro and native compression, it consistently had the worst compression ratios.
However, I was a little sad about the death of the Virtual Restore piece of HyperBac. This tool had great potential, especially since we just figured out how to script it to autoMAGICally restore all of our backups on a nightly basis. Maybe they will be able to incorporate this piece into the Backup Pro tool. Only time will tell, I guess. Enjoy!
Random Mirroring Facts
Today is a hodge podge of facts about mirroring, since I am in learning mode I thought I would share with you.
- Mirroring is deprecated, meaning it is going away and moving to AlwaysOn availability groups. Now is probably not the time to devise a mirroring plan.
- You can mirror some or all of your databases on a particular instance.
- You can only mirror databases in the FULL recovery model.
- Mirroring supports only one principal and one mirror.
- All versions support witness modes but only Enterprise supports high-performance mode.
- Enterprise, Standard and the new BI version all support the high-safety mode.
- You cannot mirror a database that is using FILESTREAM file groups.
- You can only mirror user databases.
Enjoy!
Restoration Recovery State Options
(Editor’s note: I just discovered that this blog did not post on 2013-Feb-06 as it was originally intended)
Yesterday, I was asked what the difference was in some of the restoration options. Thus, I thought this would make a good blog post as it is somewhat confusing in the beginning.
On the options page of the restore database interface in SQL Server Management Studio, there are several options than can be quite frightening to new DBAs. I have tried to explain them here in the order that they appear on the screen.
In the Recovery State options:
- Leave the database ready to use by rolling back uncommitted transactions. Additional transaction logs cannot be restored. (RESTORE WITH RECOVERY): Choose this option only if you are restoring the log files now (in full or bulk-logged recovery models). This is the default option and allows you to only go back to the last backup file.
- Leave the database non-operational, and do not roll back uncommitted transactions. Additional transaction logs can be restored. (RESTORE WITH NORECOVERY): Pick this option when you want to go to the very latest possible data! Leaves the database in a restoring mode as you restore the backup and then all of the transaction logs generated since the backup up to the point of failure (if possible).
- Leave the database in read-only mode. Undo committed transactions, but save the undo actions in a standby file so that recovery effects can be reversed. (RESTORE WITH STANDBY): The database will be left in read-only mode. At this point you can still apply transactions logs and is generally used when it takes too long to restore the system to a full database and you wish to use the server as a stand by server.
I hope this helps, enjoy!
SQL Saturday 192, Tampa Has Come and Gone But Left Its Mark!
This past weekend was SQL Saturday 192 in Tampa. Being my home user group event always makes this event special, however this was the first time I spoke at my home SQL Saturday and that made it an event that I will always cherish. In addition, this year, I took in a full day pre-con training on Friday with Buck Woody (b | t) and quite frankly it changed my life. How many times can you say that about a SQL training, let alone a $99 training?
I know what you’re thinking, believe me I do. How can a one day training change your life? I have spoken at two SQL Saturdays prior to this event and a couple of times at a couple of user group meetings so to say that I was a speaking novice would be an accurate term in my eyes anyway. In addition, I have had no formal training in public speaking except for the semester speech class that I nervously tried to avoid and almost vomited every time I stood up in front of the class.
This journey began in 2011 as I resolved myself in Andy Warren’s Professional Development Plan session at the Tampa BI SQL Saturday. I wanted to conquer this fear of public speaking and give back to the community. It seemed pretty simple. I had no idea how hard it would be and with my fight or flight instincts many times I wanted to just run away, but I did not want to embarrass myself in this community and that held me accountable.
After taking Buck’s class entitled “Creating Your Best Technical Presentation: A Speaker Workshop,” I now feel that I have the skills necessary to put together a decent presentation and deliver it without embarrassing myself. The presentation this past Saturday went well considering that I did not rewrite it, I also did not want to run or vomit and those are great things in my book. Now I have to go back and rewrite my presentation with the skills that I have learned. If you ever get the opportunity to take this class at a local SQL Saturday near you, do it!
Enjoy!
SQL Saturday #192 Tampa in a Few Days

We interrupt our series on replication, to remind everyone that this Saturday is SQL Saturday Tampa. Our Tampa user groups are proud to present a stellar lineup and three pre-con trainings this year focusing on DBA, BI, and professional development. The pre-cons are as follows:
- For the DBAs: SQL Server Internals from the practical angle by Dmitri Korotkevitch
-
For the BI enthusiasts: Taking the Next Step with Reporting Services by Jessica Moss
- For Professional Development: Creating Your Best Technical Presentation: A Speaker Workshop by Buck Woody (Come sit with me in this session with all of the cool kids!)
Keep in mind that we have moved to Hillsborough Community College Ybor Campus to accommodate our recent growth and to allow us to host more speakers featuring eight tracks this year with 46 sessions lined up. Here is a map of the layout so that you do not get lost:

If you have not registered yet, what are you waiting on? Register now and avoid the rush!
Replication Series, Part Five: Creating a Snapshot Replication
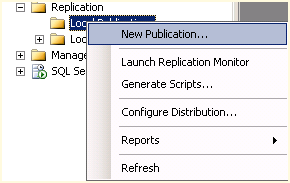
Figure 1 – New Publication
Continuing our series on replication, today we look a little deeper at Snapshot Replication. After you have ensured that replication is installed on both nodes, open the replication node in SQL Server management studio on the node that you want to be the publisher and right-click Local Publisher and select New Publication (See Figure 1).
This will open the New Publication Wizard. Select Next if you are presented with a starting page. Choose the defaulted server which should be your local server and select Next.
Now we are prompted for the snapshot folder. This is the network share that needs to have permissions enabled for the publisher and subscriber.
Next we will choose the database that we wish to replicate and then select Next. Then we will select the Snapshot publication type as shown in Figure 2.

Figure 2 – Replication Type
Then we will select the articles or tables and views that we wish to replicate. Here, I have selected all tables and views in Figure 3, but you can drill down and select only certain ones if you prefer. The next screen indicates if there are any issues and how to correct them.
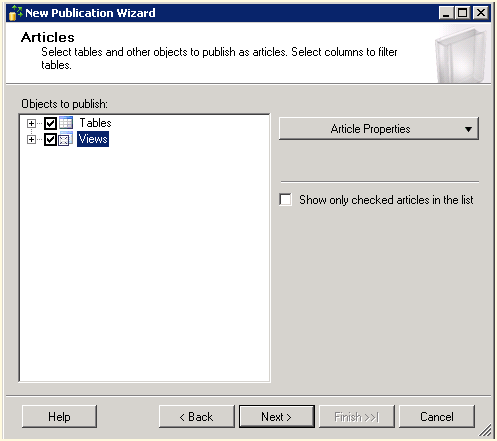
Figure 3 – Select Articles
Now we must setup the agent and create the snapshot so that we may initialize the subscription as shown in Figure 4. Select the Change button to set up your scheduled agent times to generate your snapshot.

Figure 4 – Snapshot Agent
On the final page of the wizard, we must select an account that will run the agent. You can run this under a Windows account or the SQL Server Agent service but I would not recommend that as it is not best practices. After you name the publication you will see a status screen as your publication is set up by SQL Server. You’re done!
Stay tuned and enjoy!
Replication Series, Part Four: Snapshot Replication
Continuing our series on replication, today we look at Snapshot Replication. When is the best time to use snapshot replication?
- Your data changes infrequently or you have a set of static tables such as lookup tables.
- You have a small amount of data with which to replicate.
- You make a great deal of changes over short periods of time. For example, you have a database that only gets updated once a year like for open enrollment.
One of the caveats to snapshot replication is the snapshot folder permissions. The replication agents must have the appropriate permissions to read and write to the snapshot folder.
Another caveat is that you can only compress the snapshot if it is less than 2GB in size.
Stay tuned and enjoy tomorrow as we configure the snapshot replication!
SQL Saturday #192 Tampa
We interrupt our series on replication, to remind everyone that next week is SQL Saturday Tampa. Our Tampa user groups are proud to present a stellar lineup and three pre-con trainings this year focusing on DBA, BI, and professional development. The pre-cons are as follows:
- For the DBAs: SQL Server Internals from the practical angle by Dmitri Korotkevitch
-
For the BI enthusiasts: Taking the Next Step with Reporting Services by Jessica Moss
- For Professional Development: Creating Your Best Technical Presentation: A Speaker Workshop by Buck Woody
Keep in mind that we have moved to Hillsborough Community College Ybor Campus to accommodate our recent growth and to allow us to host more speakers featuring eight tracks this year with 46 sessions lined up.
If you have not registered yet, what are you waiting on? Register now and avoid the rush!
Replication Series, Part Three: Preparation
Continuing our series on replication, today we look at the steps to prepare for replication found within SQL Server.
The first step is to ensure that you have replication installed on each of the nodes that you wish to use replication. One good way to determine if you have it installed is to run the Installed SQL Server features discovery report from the tools menu of the SQL Server Installation Center. If you do not see the feature installed then you will need to install it.

Figure 1 – Discovery Report
Stay tuned and enjoy!


