Category Archives: Database Administration Tasks
Replication Series, Part Five: Creating a Snapshot Replication
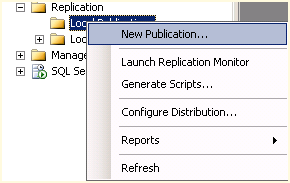
Figure 1 – New Publication
Continuing our series on replication, today we look a little deeper at Snapshot Replication. After you have ensured that replication is installed on both nodes, open the replication node in SQL Server management studio on the node that you want to be the publisher and right-click Local Publisher and select New Publication (See Figure 1).
This will open the New Publication Wizard. Select Next if you are presented with a starting page. Choose the defaulted server which should be your local server and select Next.
Now we are prompted for the snapshot folder. This is the network share that needs to have permissions enabled for the publisher and subscriber.
Next we will choose the database that we wish to replicate and then select Next. Then we will select the Snapshot publication type as shown in Figure 2.

Figure 2 – Replication Type
Then we will select the articles or tables and views that we wish to replicate. Here, I have selected all tables and views in Figure 3, but you can drill down and select only certain ones if you prefer. The next screen indicates if there are any issues and how to correct them.
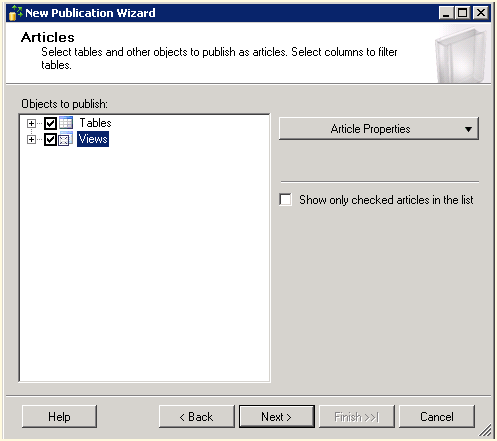
Figure 3 – Select Articles
Now we must setup the agent and create the snapshot so that we may initialize the subscription as shown in Figure 4. Select the Change button to set up your scheduled agent times to generate your snapshot.

Figure 4 – Snapshot Agent
On the final page of the wizard, we must select an account that will run the agent. You can run this under a Windows account or the SQL Server Agent service but I would not recommend that as it is not best practices. After you name the publication you will see a status screen as your publication is set up by SQL Server. You’re done!
Stay tuned and enjoy!
Replication Series, Part Four: Snapshot Replication
Continuing our series on replication, today we look at Snapshot Replication. When is the best time to use snapshot replication?
- Your data changes infrequently or you have a set of static tables such as lookup tables.
- You have a small amount of data with which to replicate.
- You make a great deal of changes over short periods of time. For example, you have a database that only gets updated once a year like for open enrollment.
One of the caveats to snapshot replication is the snapshot folder permissions. The replication agents must have the appropriate permissions to read and write to the snapshot folder.
Another caveat is that you can only compress the snapshot if it is less than 2GB in size.
Stay tuned and enjoy tomorrow as we configure the snapshot replication!
Replication Series, Part Three: Preparation
Continuing our series on replication, today we look at the steps to prepare for replication found within SQL Server.
The first step is to ensure that you have replication installed on each of the nodes that you wish to use replication. One good way to determine if you have it installed is to run the Installed SQL Server features discovery report from the tools menu of the SQL Server Installation Center. If you do not see the feature installed then you will need to install it.

Figure 1 – Discovery Report
Stay tuned and enjoy!
Replication Series, Part Two: Replication Types
Continuing our series on replication, today we look at the different types of replication found within SQL Server.
Within the replication realm we have four different forms of replication:
- Transactional replication: transactions are updated as soon as they happen (near real time) between the publisher and subscriber.
- Snapshot replication: replicates data at a point-in-time, typically used for data that does not change often. Completes refreshes of data entirely instead of incrementally.
- Peer-to-Peer replication: similar to transactional replication, replicates data to multiple server instances or nodes. Changes occur as they happen and allows for data redundancy.
- Merge replication: similar to transactional replication, but changes are made via synchronization triggers when the nodes are reconnected.
Stay tuned and enjoy!
Replication Series, Part One: The Beginning
Fresh back from a week of intense training in the SQLskills.com Immersion Event Two, I thought I would start a new learning series on replication. Today we will start with the basics, definitions.
- Publisher: A database instance that publishes data to other instances.
- Subscriber: A database instance that receives publications.
- Article: A published object which can be a table, view, user-defined function, indexed view, or stored procedure.
- Publication: A collection of articles to be published.
- Distributor: A database instance that manages the distribution between publisher and subscriber.
- Local Distributor: A distributor located on the same LAN as the publisher.
- Remote Distributor: A distributor located on a remote network from the publisher.
- Agent: A service enabling replication tasks such as publishing, distributing, and subscribing.
Stay tuned and enjoy!
Need to Predict Backup Sizes?
Someone showed me a neat trick a little while ago that I thought I would pass on. The problem is I wrote down the trick but not who told it to me, so if you are reading this and you think it was you who told me please let me know and I will cite you properly. I apologize for this transgression but I thought the tip was appropriate given my recent posts concerning backup and recovery and I was searching through some old notes looking for something to blog about tonight.
Have you ever added a new database to your server and thought to yourself, hey do I have enough space on my backup drive to cover however many days you are backing up? Here is an easy way to get a general idea for an uncompressed backup size. If you are running compression, then it will obviously be less but this is an estimate.
USE <Database Name>
GO
EXEC sp_spaceused @updateusage = ‘TRUE’
Which for a particular database on one of my servers it returned:
| database_name | database_size | unallocated_space | |
| <Database Name> | 2449.81 MB | 40.45 MB | |
| reserved | data | index_size | unused |
| 2396472 KB | 2386856 KB | 5144 KB | 4472 KB |
The actual uncompressed backup for this database was 2,317,543 KB and the reserved data from the stored procedure was 2,396,472 which is pretty close to the actual backup. Not bad, huh? I hope this helps.
SQL Features Discovery Report
While going through my preparation for the MCSA exam I stumbled upon this gem that I always seem to forget about so I thought I would pass it along to you. For a quick an easy way to determine what is installed on an instance of SQL Server, run the SQL Server Installation Center and select tools. Then select Installed SQL Server features discovery report, as shown in Figure 1. This will produce a nice report as shown in Figure 2.
Enjoy!
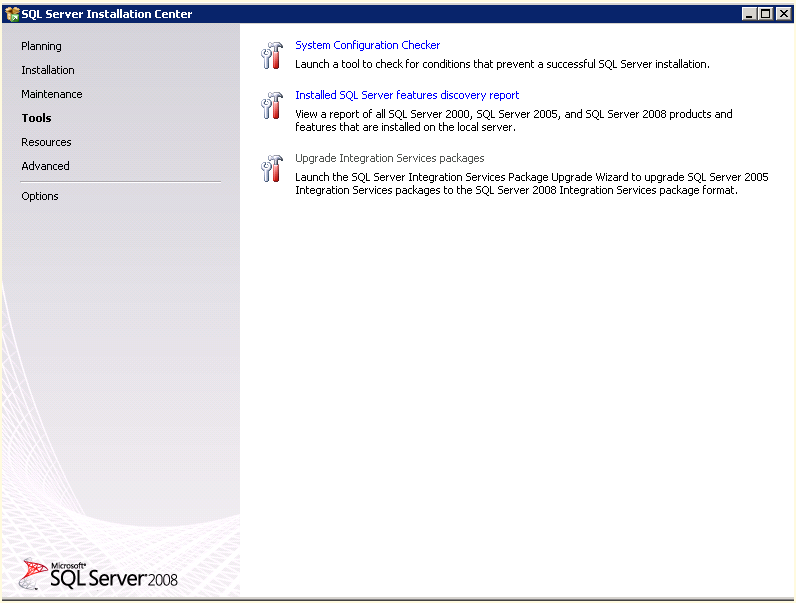
Figure 1 – SQL Server Installation Center

Figure 2 – Setup Discovery Report
Restoration Options
Today I was asked what the difference was in some of the restoration options. Thus, I thought this would make a good blog post as it is somewhat confusing in the beginning.
On the options page of the restore database interface in SQL Server Management Studio, there are several options than can be quite frightening to new DBAs. I have tried to explain them here in the order that they appear on the screen:
- Overwrite the existing database (WITH REPLACE): This is a scary option as you should always make sure that you REALLY want to overwrite an existing database. Proceed with caution. This option overwrites a safety check that prevents you from overwriting database X with database Y.
- Preserve the replication settings (WITH KEEP_REPLICATION): This option is really only relevant if the database was replicated when the backup was created. I do not have a strong background in replication so I don’t have much to add to this item.
- Prompt before restoring each backup: This essentially will let you pause a restore with a dialog box prompt when moving between media sets. Unless your backup is stored across multiple tapes, this is probably of little use to you. This might be helpful if you would like to break up the restore into smaller pieces, but I am not sure that is practical.
- Restrict access to the restored database (WITH RESTRICTED_USER): This option will make your restored database only available to the members of sysadmin, dbcreator, or db_owner roles. This might be helpful if you need to perform additional steps before making the database available to the users to keep them from accidentally jeopardizing some scripts you need to run post restore.
I hope this helps your understanding. Stay tuned for tomorrow where we discuss the recovery state options. Enjoy!
Moving SSRS Reports
Yesterday I was tasked with migrating our Citrix EdgeSight database off of a 2005 SQL Server and migrating it to a new 2008R2 Server. No problem, I have done that a million times before. But wait a minute, that database has SSRS reports installed on that server and not our main reporting server. If you follow my blog, you will probably see that I have not had much experience with SSRS, my reporting experience has been with Crystal and other minor packages.
I started researching how to migrate these reports and was not pleased to see Citrix’s response. They recommended migrating the ReportServer and ReportServerTempDB databases to the new server and then reinstalling SSRS on the original server. So what happens then if you have other jobs on the new and old servers? This is not a good recommendation. After an exhaustive search the only option I saw within the tool was to download reports one at a time and upload them into the new server. This was also not an option with a fair amount of reports to migrate.
 Enter Reporting Services Scripter from SQLdbatips.com. Run the program on the original server and select your Report folder and scripts are generated and placed into a folder of your choosing. These scripts can then be copied over to the new server and executed by command shell. In this particular instance we had to reopen the data source and enter new credentials. Problem solved, reports migrated successfully.
Enjoy!
SQL Server Auditing: A Learning Series Part Nine, Reporting
Continuing our learning series on auditing, today we look at the next logical step: Reporting. We have created audits for the server and for the database as well as being able to query the audits, but what good is an audit if you cannot print a report and hand it to the auditors?
Having been a developer and admin in my past life, you may find it strange that I have never before today created a SQL Server Reporting Services report. Now don’t get me wrong, I have written a boat load of reports in many other formats (crystal, web, actuate, etc) but have never really had the opportunity or the pleasure to write in my preferred environment.
Given the following function, I thought reporting would be a little more difficult:
SELECT * FROM fn_get_audit_file (‘g:\auditing\*’, DEFAULT, DEFAULT)
This arguments for this function are (file_pattern, initial_file_name, audit_file_offset). The file_pattern argument must include a path and a filename but can include a wildcard. The initial_file_name argument must specify the path and name of a specific file in the file set to start reading the records from or the DEFAULT|NULL value. The audit_file_offset argument will beginning reading the first record after the specified offset (which is a field that can be queried with the function).
Now on to the report….
- Open Visual Studio and choose File –> New Project.
- Select Report Server Project Wizard and name the project appropriately.
- Enter your connection information and credentials.
- When prompted to design the query enter the query above as shown in Figure 1.
- Select additional reporting options as your preferences allow and then save the report.

Figure 1 – Report Wizard Query String
This concludes our series on auditing, I hope you found it helpful!


